Thursday, November 10, 2011

eye candy for the frame shop


This afternoon one of our new framing vendors came by unexpectedly with a fun, colorful new collection of hand-crafted Italian wood mouldings that I couldn't resist sharing. In the midst of all the dust and dirt, this fabulous collection of lacquered inlays, birdseye maples, African wenge, zebra oak, olive, pecan and burl veneers got my creative juices going.


All the things I can do with these! The collection boasts width sizes from 1" to 5 1/2", and a stunning selection of patterns from checker blocks and stripes, to bubbles and swirls. One of my favorite framing tricks for something really fun and creative is to stack mouldings - the possiblities are endless and provide pure sculpture for the wall.


This will definitely make the move to our new walls the end of next week, a delicious treat. We were promised delivery of corner samples in time for Christmas framing, and as you can see below, the blank canvas eagerly awaits.


This one is Walter's personal favorite...


And this one is mine - love those organic inlaid bubbles.


For more about the frame shop at Lynden Gallery, see our website, www.lyndengallery.com

Sunday, November 6, 2011

peanut butter cookies and plaster


So the detailing begins, and I think plaster is my husband David's favorite medium. He spent a week scraping, plastering and repainting the gallery ceiling before we even got started on the dirty work.


So as he spent the late afternoon mixing plaster of Paris and wrapping the raw top edge of the window well in chicken wire, I headed to the kitchen to bake - my chosen artistic medium. While the porkchops were baking and the rice simmering for dinner, I put together a salad and a batch of Whole Wheat Peanut Butter Cookies. Layne stopped in for dinner, then delivered a hot serving to Lynden at work - how many projectionists get a hot meal on the job?


Combine in a mixer and cream:
1/2 cup softened margarine
1 cup peanut butter
1 cup toasted wheat germ
1 1/2 cups brown sugar

Add the following and whip until fairly smooth:
1 egg
6 tbs. water
2 tsp. vanilla

With the following dry ingredients added in, mix until combined:
1 1/2 cup whole wheat flour
1 c. dry milk solids
1/2 tsp. salt
1 tsp. baking powder
2 tsp. baking soda

Roll into ping pong ball size balls, flatten and score with a fork in both directions, then bake in a 350 degree oven for about 12 minutes.


David's artistry in process....


And mine. I'm going to enjoy it until the dust settles and the painting begins.

Saturday, November 5, 2011

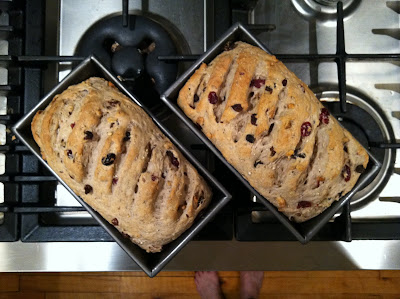
oatmeal cranberry walnut raisin bread


Some might think this is overkill, but it's just plain delicious. A "More with Less" oatmeal bread favorite recipe since Jenna and Joe were little, I've done numerous variations on the theme. One summer I even tried it with candied ginger and figs, and have been meaning to do it again ever since. Alas, I don't typically have both ingredients in my pantry at the same time.

This version was first created for Thanksgiving dinner at the Clemens' house a few years back, and my nephew Alec begs me for it every time we speak. I promise, Alec, I'll make it again for you this year - and stash an extra loaf aside for you to take home.

In a medium bowl add and whip together, then set aside until foamy:
2 1/2 cups hot water from the tap - as hot as you can stand to touch
1/4 cup honey
2 tbs. yeast

Stir in the following, or some combination of whole grains of the same measure. Again, set it aside until it bubbles and nearly doubles in size:
1 cup rolled oats - not the instant kind
1/2 cup 14-grain cereal - I buy this in bulk at a local country store
2 tbs. whole flax seed
2 tbs. olive oil
1 tbs. salt
1 cup whole wheat flour

Add the following and then stir in unbleached, white occident flour until it is bulky and dry enough to turn onto a greased countertop:
1/2 cup craisins
1/3 cup chopped walnuts
1/2 cup raisins

Knead more flour into the dough, kneading generously about 5 minutes. You know you've added enough flour when it no longer sticks to your fingers and is rather elastic when you poke your finger into it. Sensitivity to the temperature and working of bread dough is key. Oil your bowl and put the dough back in to rise in a warm place with a light towel on top. It should double in size in 30 minutes or so.

Remove the dough to a lightly oiled countertop and pound it down. Divide into two equal parts, knead it a bit more, then shape into loaves. Put them in two greased bread pans (I usually use 2 pans slightly smaller than the typical bread pan), spray them with olive oil, slash the tops on an angle, cover them with a towel, and let rise again.

When they have again doubled in size, bake them in a 350 degree oven for 20-30 minutes, or until lightly browned. When you remove them from the pan and tap on the bottom, they should sound kind of hollow. Nothing as yummy as butter melted on a slice right out of the oven. This bread makes wonderful toast for as long as it lasts.


Wednesday, November 2, 2011

who's going to clean up this mess?


Ok, I'll admit it. It's a bit overwhelming at the moment! But I'm excited with the unearthed possibilities of it all. Each step is explorative with it's own narrative, and that is what makes it so much fun.


On the right side, near the corner about shoulder height, I can see layers of paint and history - the same, antiseptic, institutional-looking, turquoisey, blue paint that was on the second floor when we bought the property. It was on every piece of trim, the ceiling, and the 11 and 14-foot ceilings up there - every inch of 2500 square feet. Someone really liked that paint.


We did manage to get the salvaged door up between the mess and the frame shop, which Dave thanked me for this morning.


On that side of the wall, it's orderly, neat, and business as usual. Minus the wheelbarrow, of course.

Tuesday, November 1, 2011

lynden at lynden


Tonight was the moment of truth... I've been sweating bullets wondering if this crazy idea of mine was going to come to fruition as I envisioned it.

Lynden started the first window, digging away at the mortar around one of the concrete blocks, then following it with sledgehammer blows. What we didn't expect was two rows of concrete block, but he wasn't deterred.

With only one small hole through to the other side, he and David began spelling each other, and spending less time than I would have expected, made it through to the other side.

Cool.

And a neat and tidy pile of rubble after I did my small bit with the shop broom afterward - I got the easy job. We'll see if I'm still saying that all this week as I'm wiping up the thin layer of dust off of everything in the gallery.

And on the other side, a view into the gallery. Of course next week, this is going to look different too.

But I think it's fitting Lynden got the fun part, 12 years later, in the building that bears his name.

Saturday, October 29, 2011

windows revealed

The cabinetry is down and the window locations, with curved tops are revealed - they missed the electrical box by several inches, so opening them up is viable - you never know what you are going to find when you start ripping things out, so this was a big question mark.

This was an outside wall, the back of the gallery an addition added in about 1920. The original fire hall was just the front section built in 1882 and was all brick. At some point prior to the rear of the building being added, it was covered with stucco, which you can see at the bottom of the picture where it's been chipped of the brick.


Meanwhile on the other side of the room, the new wall is up on the frameshop side, painted and just about ready for a door. We'll reconfigure the worktable arrangement over there just a bit, and then we can leave Dave alone and out of the dust.


We found the old front door from the building in the basement, which we had replaced when we purchased the property in 2000. It's in the process of having the hardware removed, the old paint stripped off - the rotted part at the bottom needs to be trimmed. Everyone who sees it is suggesting we keep the old stickers on the glass - not so sure about that.


The door handle and lockset is rather cool and retro, so I'm hoping we can shine up the brass and reinstall it. Much to do... need to establish a timeline and priority list, so we don't get too sidetracked in discovery!

Wednesday, October 19, 2011

gallery renovations underway


After almost a year of planning, we're finally underway! My husband, David has been busy with prep work the last few weeks, stripping up carpet, removing the tack strips, scraping, repairing and repainting the ceiling - (ceiling looks great, don't you think?)


We spent this evening moving artwork out of storage into the center of the gallery temporarily, as we'll be renovating that space first. We'll tear out the existing cabinetry and explore that wall - wait until you see what we're considering....pretty cool, if my assumptions are correct.


A wall is going up between the storage area and the frame shop, giving us even more wall space to store art. Meanwhile Dave Patton, our most excellent framer, will continue business as usual in the back, safe from the dust of renovation out front. We intend to not miss a beat with customer service.


Now, tomorrow we have to move those big tables a foot to the side to make room to get the wall up. Fun.